What is Tor and a Relay server?
Tor is short for The Onion Router, like the layers of an onion, it encrypts your data in multiple layers and sends it through a circuit of multiple nodes. Each node (or relay) only decrypts the outer layer to get the information where to send the packet next. The last hop, the Exit Node, decrypts the last layer and sends your information to it’s destination address without revealing the IP Address of the original sender (you). That way Tor can help you to improve your anonymity while using the internet.
Now, the network of Tor can only work, if as many people as possible are donating their bandwidth as Relay or Bridge servers. They are essentially providing the bandwidth that is needed for the network to actually work. And thats where you come in! You can actually run a Tor relay server by yourself!
So let’s get started!
Preparation
As we talked before, you will need a Raspberry Pi or something comparable, installed with an operating system like Raspbian.
Config file creation
The /etc/tor/torrc is THE base config file, where you configure everything concerning tor. You can either just go to the provided standard file itself and make your changes, or use this website to generate the config file through the following service: https://tor-relay.co/
Even better, the website provides a simple script, which performs all the steps to get tor running after you have filled out the web form. More on that under Installation
In case you are interested, these are the important fields we need:
SocksPort 9050
RunAsDaemon 1
ORPort 9001
Nickname YOURNICKNAME
ContactInfo *mail address or even empty*
DirPort 9030
ExitPolicy reject *:*
DisableDebuggerAttachment 0
ControlPort 9051
CookieAuthentication 1
Installation
Installation is pretty simple if you follow the guide from the tor relay website, you will have a script, that does all the configuration for you. See the guide from the creator himself:
https://flxn.de/posts/tor-relay-tutorial/
Apart from that guide, you can also easily install Tor manually.
As we have a Raspberry Pi, which is based on Debian, we just follow the official guide: https://www.torproject.org/docs/debian.html.en
Add the following entries to /etc/apt/sources.list or a new file in /etc/apt/sources.list.d/:
deb https://deb.torproject.org/torproject.org stretch main
deb-src https://deb.torproject.org/torproject.org stretch main
Then add the gpg key used to sign the packages by running the following commands at your command prompt:
curl https://deb.torproject.org/torproject.org/A3C4F0F979CAA22CDBA8F512EE8CBC9E886DDD89.asc | gpg --import
gpg --export A3C4F0F979CAA22CDBA8F512EE8CBC9E886DDD89 | apt-key add -
The Tor project provides a Debian package to help you keep our signing key current. It is recommended you use it. Additionally, we are installing arm/nyx, which is a monitoring tool for tor. Install it with the following commands:
apt update
# Debian 9 (stretch)
apt install tor arm deb.torproject.org-keyring
# Debian 10 (buster)
apt install tor nyx deb.torproject.org-keyring
After that make sure that you have the proper settings in the torrc file, and you are good to go.
Checking the Installation
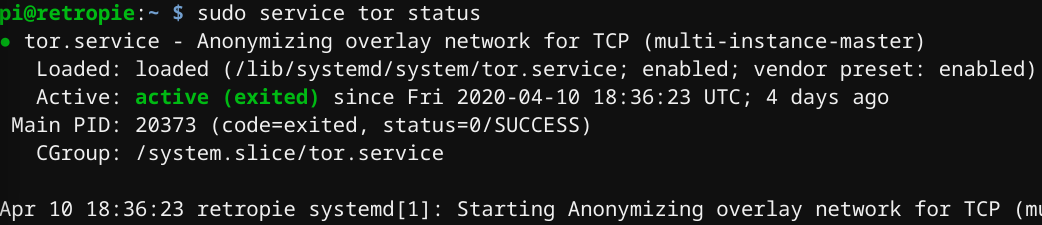
After you have installed Tor and configured your torrc file, you can check on the status of your tor service and restart.
It should come up normally:
sudo service tor status
If you are not sure whether the service already uses your latest config file, you can simply restart the service:
sudo service tor restart
Automatically upading everything
Perfect! You have now everything set up and should work like a charm. However there are updates coming out regularly of the operating system or tor itself. Hence you should regularly update.
The easiest approach is to use a cronjob there. Here’s how you do it:
sudo crontab -e
That opens crontab in an editor. We will update the system everyday at midnight in regards to packages, which includes the tor package. And once a month, we are restarting the tor service, so that we actually use updated packages for tor.
Add the following lines in crontab to achieve that:
0 0 * * 0 root (apt update && apt upgrade -d -y) > /dev/null
0 3 1 * * root (service tor restart) > /dev/null
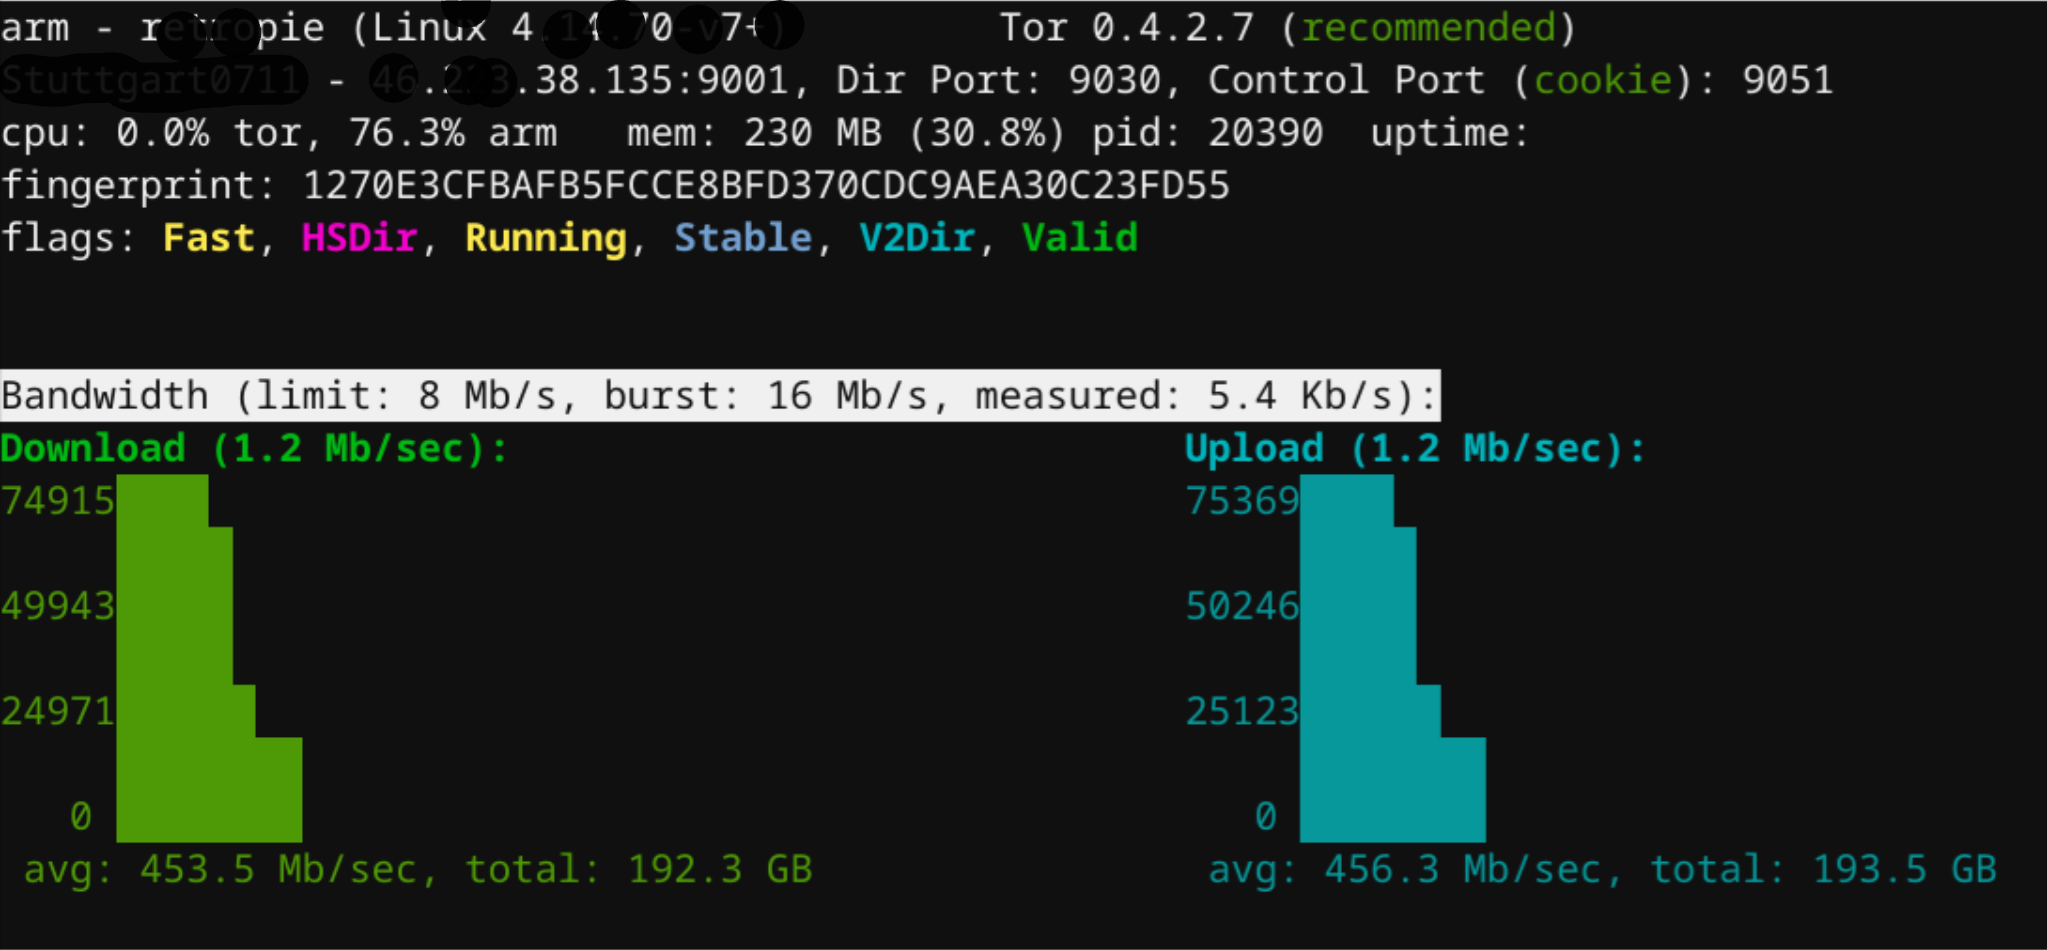
Checking your Tor service
With the very nice tool ARM, you can now connect to your local Tor Server and see some statistics:
# Debian 9 (Stretch)
sudo -u debian-tor arm
# Debian 10 (Buster)
sudo -u debian-tor nyx
Thanks for reading and feedback is welcome!